

A Developer's Guide to Squash and Merge in Git
Squash and merge is a Git strategy where you take all the messy, granular commits from a feature branch and roll them up into a single, clean commit on your main branch. Think of it as tidying up before you let anyone see your work. Instead of a project history filled with minor edits and "WIP" commits, you get one concise summary of the entire feature. It makes the project's history a hell of a lot easier to read and understand.
What Is Squash and Merge and Why Does It Matter
Imagine a writer sending their editor a manuscript, but instead of a final draft, they send a folder containing every version with every single typo fix, sentence rephrase, and paragraph shuffle saved separately. The history would be a chaotic mess, impossible to follow. Squash and merge is the developer's equivalent of sending in that clean, final draft.
Instead of cluttering up your main branch history with dozens of small, intermediate commits like 'fix typo' or 'oops, forgot a file,' this strategy lets you bundle them all together. What you're left with is a single, meaningful commit that represents the entire body of work for a feature or bug fix.
This simple act transforms a potentially noisy and convoluted commit log into a clean, linear story of how the project evolved. It's not just about making things look pretty; it’s about making your history manageable and useful.
The Value of a Readable History
A clean history isn't a luxury; it's a valuable asset for any development team. It makes a few critical, everyday tasks much, much simpler.
- Easier Navigation: Need to know when a specific feature was added? A linear history is way faster to scan than one bogged down by hundreds of tiny, irrelevant commits.
- Simplified Debugging: Tools like
git bisect, which automatically hunt down the commit that introduced a bug, become exponentially more effective. They only have to check one commit per feature, not twenty. - Improved Onboarding: New team members can get up to speed by reading the project history like a well-organized changelog. They don’t have to piece together a story from a hundred scattered puzzle pieces.
This focus on a clean, understandable main branch is exactly why squash and merge has become so popular. According to the 2023 Stack Overflow Developer Survey, 60% of developers are now using it regularly, making it a common practice. Still, with over 35% of teams sticking to traditional merge commits, it's clear that different projects have different needs. You can learn more about these Git workflow trends and their implications.
A clean commit history is a form of documentation. Each commit should tell a story, and squashing helps ensure each story is a complete chapter, not just a single, disjointed sentence.
Platforms like GitHub have baked this workflow right into their UI, making it dead simple for anyone to use. The option to "Squash and merge" is right there when you’re ready to finalize a pull request.
Here’s what that "Squash and merge" button typically looks like on a GitHub pull request.
This button takes care of the entire process, letting you condense your branch's commit history into a single, polished commit with just one click.
Choosing Your Merge Strategy: Squash vs. Rebase vs. Merge Commit
Deciding how to get your feature branch into main is one of those choices that quietly shapes your entire project. It’s not just a Git command; it's a decision about how your team tells the story of its code over time. The big three—squash, rebase, and the classic merge commit—each have their own philosophy.
Picking the right one isn't about finding the single "best" method. It's about matching your merge strategy to what your team and project really need. Are you optimizing for a clean, readable history? Or is a detailed, unedited audit trail more important?
Squash and Merge: The Clean Storyteller
Think of squash and merge as the minimalist of the group. It takes every single commit from your feature branch—the good, the bad, and the "oops, fix typo"—and bundles them up into one tidy commit on the main branch.
This approach gives you a beautiful, linear history that’s a breeze to read. Every entry in the Git log represents a complete feature or bug fix. It’s perfect for understanding the project’s evolution at a high level, because you don’t see the messy work-in-progress, just the polished final result.
Merge Commit: The Full Historian
A merge commit, which is often the default in Git, is all about preserving history. When you merge a branch this way, Git creates a special "merge commit" that ties the two histories together, keeping every single original commit from the feature branch completely intact.
This gives you a perfect, unaltered audit trail. You can see every step a developer took to build a feature, which is priceless for projects needing strict compliance or deep historical analysis. The trade-off? This often leads to a complex, branching history that can look like spaghetti and be tough to navigate.
Rebase and Merge: The Linear Hybrid
Rebase and merge tries to give you the best of both worlds. Before merging, it takes your feature branch's commits and replays them, one by one, on top of the latest version of the main branch. This creates a linear history like a squash, but it keeps the individual commits.
The result is a clean, straight-line history that's easy to follow, while still holding on to that step-by-step development story. The big catch is that you're rewriting history. This can get complicated and cause major headaches if multiple developers are working on the same branch.
Choosing a merge strategy is like deciding how to write a history book. Do you want the high-level summary of major events (Squash), the detailed day-by-day account (Merge Commit), or a curated timeline (Rebase)?
This simple decision tree gets to the heart of the choice. If a clean, high-level Git history is what you’re after, the path points straight to squash and merge.
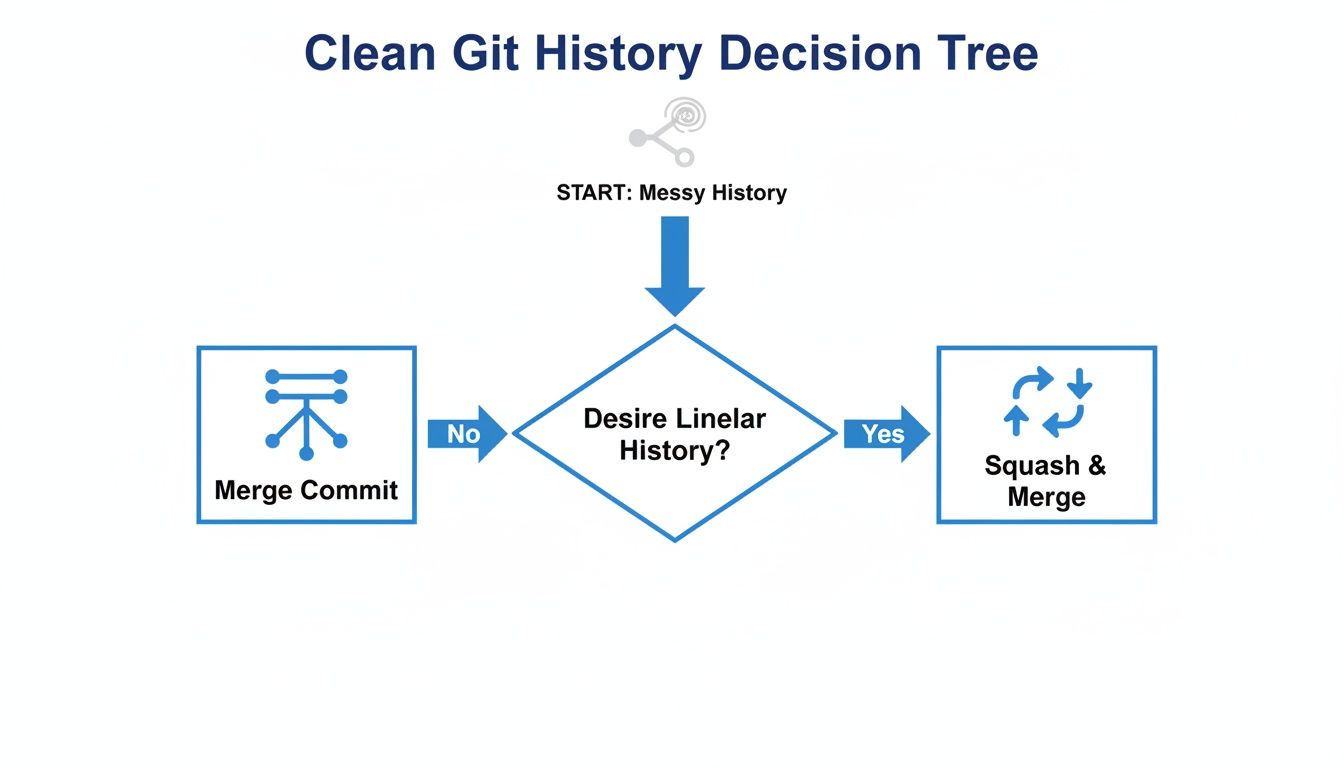
As the diagram shows, the main reason teams pick squash and merge is the desire for a simple, more readable main branch history.
Git Merge Strategy Comparison
To help you decide, it helps to see the strategies side-by-side. Each one has a different impact on your project's history, how easy it is to trace changes, and the overall complexity of your workflow.
| Strategy | Commit History | Traceability | Best For | Main Downside |
|---|---|---|---|---|
| Squash and Merge | Linear, condensed. One commit per feature. | High-level. Details are in the PR, not the Git log. | Teams valuing a clean, readable main branch history. | Loses granular commit history from the feature branch. |
| Merge Commit | Branching, complex. Preserves all commits. | Complete. Every individual commit is recorded. | Projects needing a detailed audit trail and history. | Can create a messy, hard-to-follow "spaghetti" history. |
| Rebase and Merge | Linear, detailed. Preserves individual commits. | Good. Individual commits are kept, but rewritten. | Teams wanting a linear history with commit details. | Risk of rewriting shared history and complex conflict resolution. |
Ultimately, the best choice really boils down to your team's priorities. If your main goal is a project history that reads like a clean, high-level changelog, then squash and merge is a fantastic option. It turns your main branch into a reliable source of truth about what features were added and when, without all the noise from the development process.
How to Perform a Squash and Merge

Alright, let's get our hands dirty. Whether you live in the command line or prefer the comfort of a GUI, squashing your commits is pretty straightforward once you know the ropes.
We’ll cover both approaches. That way, no matter how you work, you can confidently bundle up your commits into a single, clean package that’s ready for the main branch.
Using GitHub or GitLab for a Visual Workflow
For a lot of developers, the path of least resistance is to squash and merge right inside a pull request (or merge request, if you're on GitLab). Platforms like GitHub have baked this workflow directly into their UI, turning a potentially complex Git operation into just a couple of clicks.
Let's walk through it on GitHub, but the steps are almost identical on GitLab.
- Open Your Pull Request: Head over to the pull request you're ready to merge. You’ll see the familiar green "Merge pull request" button.
- Click the Dropdown Arrow: Just to the right of that button is a little dropdown arrow. Click it to see the other merge options your repository has enabled.
- Select "Squash and merge": Choose this option from the list. The UI will change, giving you a text box to edit the new, combined commit message.
GitHub does a nice job of pre-filling this message with your pull request title and a list of all the individual commit messages from your branch. This is your chance to write a clear, meaningful summary of the entire feature or fix.
A well-written squashed commit message is everything. It needs to explain the 'what' and the 'why' behind the changes, because it’s going to be the official record of your work in the main branch's history.
Once you’re happy with the message, just click the "Squash and merge" button to finalize it. Just like that, all the work from your feature branch is now a single, atomic commit on main. For a more detailed walkthrough, check out our guide to managing GitHub pull requests.
Using the Command Line for More Control
If you prefer the power and precision of the terminal, Git gives you everything you need to get the job done. The most common way to do this is with an interactive rebase, which gives you fine-grained control over how your commits are combined and rewritten.
Think of it like this: you're telling Git to rewind your branch to the point where it split off from main, and then you get to replay each of your commits, editing them as you go.
Here's how it works, step-by-step:
- Ensure Your Main Branch is Updated: First thing's first, make sure your local
mainbranch is synced up with the remote. git checkout main git pull origin main - Switch Back to Your Feature Branch: Hop back over to the branch you plan to squash. git checkout your-feature-branch
- Start an Interactive Rebase: This is the key command. You're telling Git you want to interactively rebase your current branch on top of
main. git rebase -i main - Edit the Commit List: This command will open your default text editor showing a list of every commit on your feature branch. It’ll look something like this: pick a31f2d7 Add initial feature file pick 4e8b1c9 Implement core logic pick b9c5f3e Fix typo in comment pick f1d6a0b Add unit tests
- Squash Your Commits: To roll them all into one, you leave the very first commit as
pickand change all the following ones tosquash(or its shorthand,s). pick a31f2d7 Add initial feature file squash 4e8b1c9 Implement core logic squash b9c5f3e Fix typo in comment squash f1d6a0b Add unit tests - Write the New Commit Message: Save and close that file. Git will immediately open another editor window, this time prompting you to write the final, consolidated commit message for your new single commit.
- Push Your Changes: After you save the new commit message, your local branch history has been officially rewritten. Now you need to update the remote branch, which requires a force-push.
git push --force-with-lease origin your-feature-branch
A quick tip: using
--force-with-leaseis much safer than a plaingit push --force. It's a safeguard that checks if another developer has pushed new commits to the branch since you last pulled. If they have, your push will fail, preventing you from accidentally overwriting their work.
After you've pushed, you can merge the pull request on GitHub or GitLab as you normally would.
The Practical Impact of a Squash Workflow
Switching to a squash and merge workflow isn't just a small change in your Git process; it sends ripples across your entire development lifecycle. It affects everything from how fast you can hunt down bugs to the reliability of your deployment pipeline. The biggest win, and the one everyone talks about, is how much easier it makes debugging.
When you squash, your main branch transforms into a clean, high-level changelog. Each commit represents a single, complete feature. This clarity is a game-changer when something inevitably breaks. Instead of sifting through hundreds of tiny "WIP" or "fix typo" commits, you're only dealing with meaningful, feature-level changes. It makes your life a whole lot easier.
A Superpower for Git Bisect
One of the most powerful—and criminally underused—tools in Git is git bisect. It’s essentially a binary search for your commit history that automatically finds the exact commit that introduced a bug. You just give it a "good" commit (before the bug) and a "bad" one (after the bug), and it takes care of the rest.
With a messy merge history clogged with micro-commits, git bisect can be a real pain. It might land you on dozens of intermediate commits that don’t even compile, turning a quick debugging session into a frustrating slog.
But in a squash workflow, git bisect becomes your secret weapon. Since every single commit on main is a fully tested, working feature, the tool can zero in on the problem at lightning speed. It just jumps from one complete feature to the next, asking, "Is the bug here?" This can cut the time it takes to find a regression from hours down to minutes.
A squashed history turns
git bisectfrom a useful utility into a debugging superpower. It allows you to isolate a regression to an entire feature, not just a single line change, dramatically speeding up root cause analysis.
Honestly, this efficiency boost alone is enough to convince many teams to make the switch. It directly reduces downtime and saves developers from tedious bug-hunting expeditions.
The Trade-Off of Lost Granularity
Of course, nothing comes for free. That pristine, clean history comes at a cost: you lose the granular, step-by-step commit history from the original feature branch. When you squash and merge, the detailed story of how a feature was built—the thought process, the small fixes, the refactors—gets condensed and is no longer visible in the main branch's log.
This can have a couple of real-world consequences:
- Code Review Context: During a pull request, that commit-by-commit breakdown can be incredibly useful for reviewers. They can follow the developer’s journey and understand why certain decisions were made. A squashed commit just drops a huge, final changeset on their lap, which can make reviewing complex features a bit tougher.
- Historical Forensics: Months or years down the line, if you need to understand how a specific piece of code evolved, a squashed history gives you less to work with. That breadcrumb trail of small, incremental changes is gone.
Most modern Git platforms like GitHub and GitLab help with this by automatically including a link to the original pull request in the squashed commit message. This means you can always go back and dig into the full conversation and commit history if you need to, but it does add an extra step.
Simplifying CI/CD and Git Blame
Beyond debugging and reviews, a squash workflow also has a direct and mostly positive impact on your automation and code attribution tools.
A huge advantage shows up in your CI/CD pipeline. With a squash-and-merge strategy, every push to main is a single, atomic commit that represents one complete feature. This creates a clean, one-to-one relationship between a merge and a deployment. It makes build logs simpler to read and makes it ridiculously easy to pinpoint which feature deployment caused a problem in production.
The effect on git blame is a little more nuanced. The blame command, which shows who last modified each line of a file, will attribute all the changes from a squashed feature to the person who clicked the merge button. This can sometimes hide the contributions of the original author who did all the work.
To get around this, many teams adopt a simple convention: make sure the squashed commit message clearly mentions the original author and links back to the pull request. It’s a small step that provides all the necessary context for anyone digging through the code's history.
Advanced Squash Techniques and Best Practices
Once you get the hang of the basics, a squash and merge workflow can seriously speed things up. But the real magic happens when you master the tricky parts—like handling conflicts, reverts, and those monster feature branches that seem to live forever. Knowing how to deal with these situations is what turns a clean history from a nice-to-have into a superpower.
Moving beyond simple, clean-cut features, you're going to hit bumps in the road. Things will break, conflicts will pop up, and plans will change. Knowing how to navigate these moments with confidence is what separates the pros from the rest.
Navigating Merge Conflicts During a Rebase
One of the first hurdles you'll hit is the merge conflict during an interactive rebase (git rebase -i). This is totally normal. It just means that while you were working on your feature, someone else merged a change to the main branch that touches the same lines of code you did. Don't panic; Git gives you everything you need to sort it out.
When a conflict happens, the rebase process will just pause and wait for you. Your job is to jump into the conflicted files, clean up the mess Git shows you, and tell it you're ready to move on.
Here’s the standard game plan:
- Identify and Fix: Pop open the files Git has flagged. You’ll see the classic conflict markers (
<<<<<<<,=======,>>>>>>>). Just edit the code until it looks exactly how it should, removing the markers. - Stage Your Fixes: Once you’ve fixed a file, tell Git you're done by staging it:
git add <filename>. - Continue the Rebase: After staging all your fixes, just run
git rebase --continueto let Git move on to the next commit. If you get overwhelmed or realize you’ve made a mistake, you can always hit the eject button withgit rebase --abort.
Reverting a Squashed Commit
Here’s where squashing really shines: rolling back changes. Trying to undo a regular merge commit can be a headache, sometimes even needing a "revert of a revert." But with a squashed commit, you're just dealing with one clean entry in the history. It's incredibly simple.
To completely undo an entire feature, you just need one command:
git revert <squashed-commit-hash>
This command doesn't delete anything. Instead, it creates a brand new commit that is the perfect opposite of the squashed feature commit. It’s a clean, safe way to back out a change while keeping a clear record of what was added and later removed—perfect for production environments where you need an audit trail.
Managing Long-Lived Feature Branches
We've all been there. A big feature takes weeks, maybe even months, to build. Meanwhile, your long-lived branch is drifting further and further away from main, setting you up for a massive, painful merge conflict down the road. The trick is to periodically sync your feature branch with the latest changes from main.
A feature branch should be a temporary workspace, not an isolated island. Regularly pulling in updates from the main branch prevents a painful, large-scale merge conflict down the road and ensures your feature is being built on the most current codebase.
Instead of merging main into your feature branch—which just pollutes your commit history with merge commits—use a rebase instead:
git pull --rebase origin main
This command grabs the latest from main and neatly replays your feature's commits right on top. Doing this weekly, or even daily, keeps your branch fresh and makes the final squash and merge a total breeze.
Writing the Perfect Squashed Commit Message
Because a squashed commit erases the tiny, step-by-step commits from your main branch, its message has to do all the heavy lifting. A lazy message like "fix bug" is a crime against future developers. A great message, on the other hand, is a piece of documentation that tells the whole story.
Your goal is to nail the what and the why. A solid, proven template usually includes:
- A Clear Summary Line: Keep it short and to the point, written in the imperative mood (e.g., "Add User Profile Avatar Upload").
- The Problem or Motivation: Briefly explain why this change was needed. What user problem does it solve? What business goal does it support?
- The Solution: Describe how you solved it. Mention any key architectural decisions, new libraries, or anything else a future developer would need to know.
- A Link to the Pull Request: This is non-negotiable. Always include a reference to the PR (like "Resolves #123") so anyone can dig into the nitty-gritty discussions and code reviews if they need to.
This structure makes sure your Git log is a valuable, high-level summary of how the project has evolved, capturing all the critical context without the noise.
Enforcing Merge Policies for Cleaner Code
A consistent merge strategy is the bedrock of a healthy, scalable repository. While a squash and merge workflow is great for creating a clean history, its real power is unlocked when it becomes a team-wide policy, not just a personal habit. This is where engineering leaders step in, configuring repository settings to make the right way the only way.
For instance, platforms like GitHub and GitLab let you disable other merge options, making squash the default—or even the only—choice for pull requests. It's a simple change that guarantees every feature lands on the main branch as one clean, atomic commit. This isn't just about neatness; it's a critical defense against accumulating technical debt that can slow projects to a crawl.
Shifting Enforcement into the IDE
The problem with traditional enforcement is that it happens too late. The review process kicks in after the code has been committed and pushed, which is why we've all been stuck dealing with failed CI builds and frustrating back-and-forth revisions. The modern approach is to shift this process left, putting the enforcement right inside the developer's IDE.
By validating code quality before the commit, teams can ensure that every squashed merge is production-ready from the start, dramatically reducing review cycles and eliminating broken builds.
Tools like kluster.ai plug directly into the IDE and act as an automated gatekeeper. It's like having a senior engineer looking over your shoulder, running continuous checks for security flaws, compliance issues, and adherence to your team's specific coding standards in real time.
Validating AI-Generated Code Pre-Commit
This pre-commit verification is more critical than ever now that AI coding assistants are part of the team. Tools like Copilot can write a ton of code, but there's no guarantee that output is secure, performant, or aligned with how your team does things.
An in-IDE solution automatically reviews this AI-generated code the moment it’s written.
- Security Scans: It flags potential vulnerabilities before they even touch the codebase.
- Policy Enforcement: It makes sure naming conventions and architectural rules are followed from the get-go.
- Quality Assurance: It catches logic errors or performance drags instantly.
Catching these issues on the fly means every single piece of code is clean before a developer even thinks about opening a pull request. For teams on GitLab, this approach streamlines the entire workflow, something we dive into in our guide to optimizing GitLab merge requests. Ultimately, it turns your squash and merge strategy from a tool for a clean history into a true reflection of high-quality, reliable code.
Common Questions About Squash and Merge
Even after you get the hang of the workflow, a few specific questions always seem to pop up. Nailing down the answers to these helps make the concepts stick and gets your team ready for a smoother ride with squash-and-merge.
Is Squash and Merge a Destructive Operation?
Yes and no. It’s a classic “it depends” answer.
A squash and merge is only "destructive" to the feature branch's history. It takes all those messy, intermediate commits and replaces them with a single, clean one on your main branch. But here's the key: it’s not destructive to the main branch itself. It just adds one new, polished commit.
The original feature branch, with its full, detailed history, usually sticks around in the remote repository unless you go out of your way to delete it. So, that nitty-gritty history isn’t gone forever—it's just kept separate from the main project timeline.
When Should I Avoid Using Squash and Merge?
You'll want to hit the brakes on squashing when the play-by-play history of a feature is genuinely important. Think auditing, compliance, or legal scenarios where every single commit needs to be preserved for the record. In those cases, a traditional merge commit is your best bet, as it keeps the entire branch history intact.
It's also not a great fit for massive, long-running features with several developers all chipping in. Squashing everything could wipe out crucial context about who wrote what and why, making life a lot harder for the next person who has to maintain that code.
The core trade-off is simple: squash and merge prioritizes a clean, high-level project history over the detailed, messy history of an individual feature's development.
How Does Squash and Merge Affect Git Blame?
This is a big one, and a totally valid concern. When you squash a feature, git blame will point the finger for every single line of code at the one person who clicked the merge button. This completely obscures who actually wrote each piece of the feature.
The workaround is all about good habits. The best practice is to write a super-detailed squashed commit message. It should credit the key contributors and—most importantly—include a link back to the original pull request. That PR is your source of truth; it has the full conversation, individual commits, and all the reviewer feedback, giving you complete traceability when you need to dig deeper.
Trying to enforce these best practices by hand is a losing battle. This is where kluster.ai comes in. It runs real-time checks right inside the IDE, making sure every line of code—especially AI-generated code—is secure, compliant, and follows your team's rules before it even becomes a commit. It plugs right into your squash and merge workflow, killing bad commits at the source and ensuring your clean history is built on genuinely high-quality code. Find out more at https://kluster.ai.