

A Developer's Guide to the GitHub Pull and Merge Workflow
At its core, the GitHub pull and merge workflow is a structured conversation about your code. It's the process where a developer proposes a change (the pull request), the team discusses it, and then it gets integrated into the main project (the merge). This cycle is the absolute foundation of modern, collaborative software development.
Understanding the Modern Pull and Merge Workflow
Let's cut through the jargon and get straight to what matters on a modern development team: the pull and merge workflow. A pull request is so much more than a simple request to add code; it's a critical checkpoint for collaboration, peer review, and quality assurance. Getting this process right is non-negotiable for maintaining high code quality and making sure your team works like a well-oiled machine.
This flow has become the undisputed backbone of software development. Activity on platforms like GitHub has reached staggering levels, with developers merging an average of 43.2 million pull requests every single month - a stunning 23% jump year-over-year. This explosive growth, highlighted in the latest Octoverse report, shows just how central this workflow is to shipping code faster.
The Lifecycle of a Code Change
The entire journey, from a small change on your local machine to its final home in the main codebase, follows a clear and repeatable path. Having a mental model of this lifecycle helps you know exactly where you are in the process at any given time.
This diagram breaks down the essential steps.
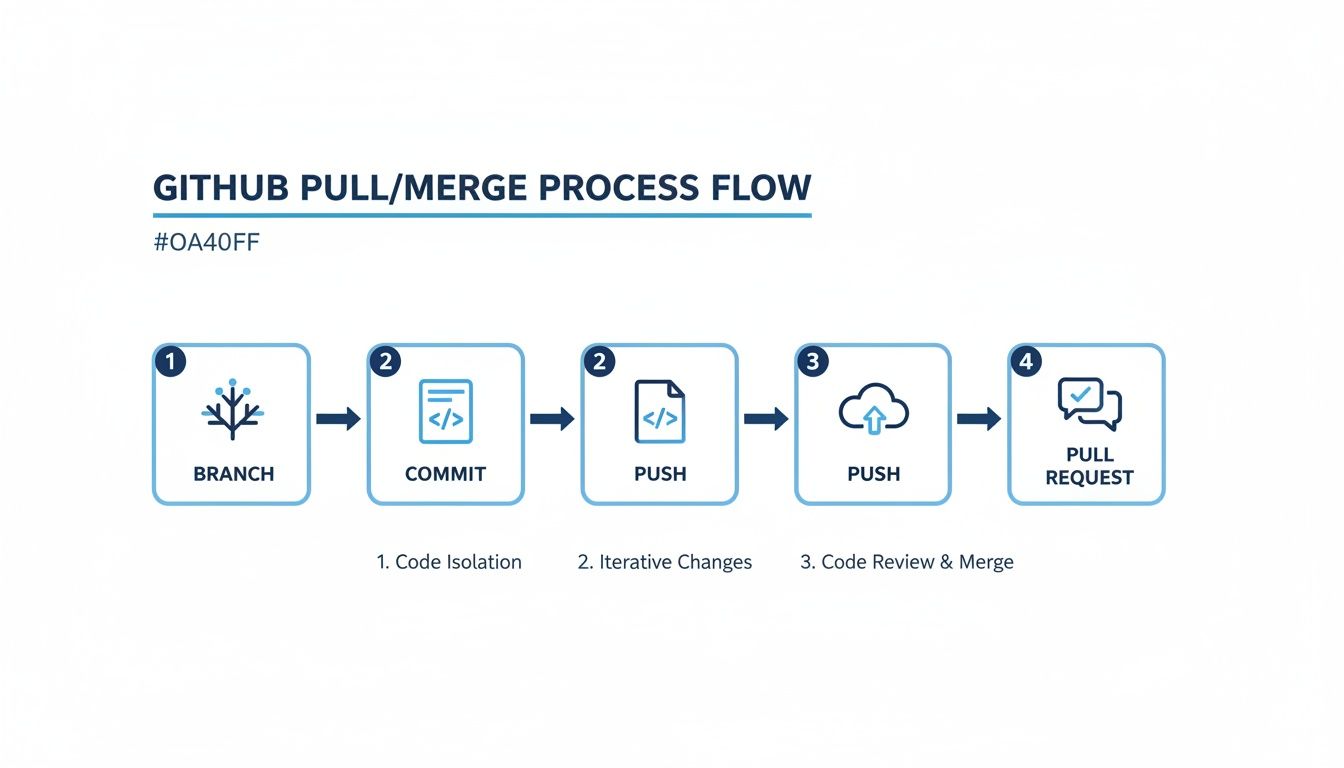
Each step, from creating a new branch to opening a pull request for review, serves a specific purpose: isolating work and making it easy for others to inspect it. This structured flow is what prevents developers from making direct changes to the main branch, which is a huge safeguard for the project's stability.
This structured approach is a core principle of effective source code management. For a deeper look, our guide on managing source code provides more context and strategies.
Why This Workflow Matters
Adopting a disciplined pull and merge process brings massive benefits that go way beyond just keeping code organized. It builds a transparent and accountable environment where every single change is documented, reviewed, and approved.
- Improved Code Quality: Every pull request gets a second (or third) set of eyes, which is invaluable for catching bugs, logic errors, and style inconsistencies before they poison the main branch.
- Enhanced Collaboration: It creates a dedicated space for developers to discuss implementation details, suggest better approaches, and share knowledge with each other. It's where mentorship happens.
- Clear Project History: A well-managed merge history tells the story of your project. It makes it easy to track features, understand why certain changes were made, and pinpoint exactly when a bug was introduced.
By treating each pull request as a non-negotiable checkpoint for quality, teams can confidently build and ship features faster without sacrificing stability. It transforms code integration from a potential risk into a collaborative achievement.
Whether you're a command-line purist or prefer the simplicity of a graphical interface, the core concepts remain the same. Before we get into the step-by-step instructions, let's take a quick look at how the two approaches compare.
Core Workflow At a Glance: CLI vs. GitHub UI
This table offers a high-level comparison of the essential steps for completing a pull and merge cycle using both the Command Line Interface (CLI) and the GitHub web interface.
| Phase | CLI Action | GitHub UI Action |
|---|---|---|
| Start Work | git checkout -b new-feature | Create a new branch from the repository page. |
| Make Changes | git add . then git commit -m "commit message" | Edit files directly in the browser or upload them. |
| Share Changes | git push -u origin new-feature | Commit changes to the new branch. |
| Propose Merge | Open browser to create a Pull Request. | Click "New pull request" and select branches. |
| Review and Discuss | No direct CLI action; use GitHub UI. | Comment on the PR, request changes, and approve. |
| Integrate | git checkout main, git pull, git merge new-feature | Click the "Merge pull request" button. |
While the CLI gives you granular control and is often faster for experienced developers, the GitHub UI provides a visual, user-friendly way to manage the entire process, especially the review and discussion phases. We'll cover both in detail next.
Mastering Pull and Merge from the Command Line
For developers who live in their terminal, the command line is the most powerful and efficient way to handle the entire GitHub pull and merge workflow. The GitHub UI is great for a visual review, but nothing beats the CLI for precise control.
Let's walk through a super common, real-world scenario: you've been tasked with building a new feature.

First thing's first: always make sure your local main branch is up-to-date with the remote repository. This one habit will save you from a world of future headaches. Trust me.
git checkout main
git pull origin main
This quick sequence hops over to your main branch and pulls down the latest changes from the server. Now you're working off a current foundation, which is exactly where you want to be.
Creating and Working on Your Feature
With main all synced up, it's time to spin up a dedicated branch for your new feature. This keeps your work isolated and ensures the main branch stays clean and stable.
git checkout -b new-auth-flowThe -b flag is a handy shortcut that creates and switches to the new branch in one shot. Now you're free to get to work - write your code, add your files, and make all the necessary changes.
As you finish logical chunks of work, remember to stage and commit them with descriptive messages. It makes the history clean and tells a story for anyone reviewing it later.
- Staging:
git add .is a quick way to add all your modified files to the staging area. - Committing:
git commit -m "feat: Implement password reset endpoint"saves your staged changes to the branch's history with a clear message.
Pushing Your Branch and Staying Synced
Once the feature feels complete, you'll want to push your branch to the remote repository. This makes it visible to your teammates and is the first step toward creating a pull request.
git push -u origin new-auth-flowUsing the -u flag the first time sets the remote branch as the "upstream" tracking branch. After this, any future pushes only need a simple git push. Easy.
But what happens if other developers have merged their own changes into main while you were busy working? This happens all the time. It's a best practice to keep your feature branch updated to sidestep any nasty merge conflicts down the road.
Before you even think about opening that pull request, pull the latest changes from the main branch into your feature branch. This ensures your code integrates smoothly with the very latest version of the codebase.
You can do this right from your feature branch with one simple command:
git pull origin mainThis command fetches the latest main branch from the remote and merges it directly into your new-auth-flow branch. If there are any conflicts, you can resolve them locally before anyone else has to see them.
After sorting out any issues, just push your updated branch again. Now you're ready to head over to the GitHub UI to open that pull request for review and get the conversation started.
Using the GitHub UI for a Visual Workflow
Look, the command line is fast and powerful, but let's be real - sometimes you just want to see what you're doing. The GitHub user interface is a fantastic, visual way to handle the whole github pull and merge process. For a lot of developers, especially when you're deep in a complex feature with a few other people, the UI is the best place to talk through, review, and finally merge your code.
The whole thing usually kicks off the moment you push a new feature branch from your local machine. GitHub is pretty smart; it spots the new branch right away and throws up a big, friendly banner on your repo's homepage, nudging you to create a pull request.

Creating and Managing Your Pull Request
Starting a pull request (PR) is dead simple. You land on a page where you can give your PR a clear title and write a detailed summary of what you've changed. This is your moment to give everyone context. Explain what the code does, why it's needed, and link to any relevant tickets or issues. A solid description is the bedrock of a quick and painless review.
This screen becomes the central hub for the entire conversation around your code. You can assign specific reviewers, add labels for better organization (like bug or feature), and even link the PR to project boards. It keeps everything in one place so the whole team can stay in the loop.
AI is also starting to change this part of the workflow in a big way. We're seeing more and more AI agents get integrated into the PR review process. In fact, 1 in 7 pull requests now involve AI agents, which is a staggering 14-fold increase. This is fundamentally shifting how code reviews get done, with bots often providing the first round of automated feedback. You can read more about the state of AI in code reviews.
Choosing Your Merge Strategy
Once your PR gets the green light from your team, you've reached the final step: the merge. GitHub gives you a big green button, but don't just click it blindly. Hit that little dropdown arrow next to it, and you'll find some crucial options.
- Create a merge commit: This is the default setting. It takes all the commits from your feature branch and wraps them up in a new merge commit on the
mainbranch. This preserves the entire history of your branch, which can be useful. - Squash and merge: This one is my personal favorite for smaller features. It squishes all of your branch's commits into a single, clean commit on the
mainbranch. It makes the project history incredibly tidy and easy to read. - Rebase and merge: This option takes your feature branch's commits and replays them on top of
main. It also creates a linear history, but without the extra merge commit. It's the cleanest look, but it requires everyone on the team to be comfortable with rebasing.
Picking a merge strategy is really a team decision. A standard merge tells the full story, a squash cleans it up, and a rebase makes it perfectly linear. Have a chat with your team and agree on a consistent approach that works for your project.
After you've made your choice and hit the button, your code is officially in. As a final housekeeping step, GitHub gives you a handy option to delete the source branch automatically. Do it. It keeps your repository clean and prevents clutter.
How to Confidently Resolve Merge Conflicts
Sooner or later, it happens to everyone. You pull the latest changes, and Git throws a wrench in your plans: a merge conflict. It's not a bug or a sign you did something wrong. It's actually a completely normal, unavoidable part of working on a team.
A conflict just means Git couldn't figure out how to automatically combine two sets of changes. Maybe you and a teammate edited the exact same line of code in different ways. Rather than making a risky guess and potentially breaking everything, Git pauses and hands the keyboard back to you, the human, to make the final call.
The trick is to stay calm and understand what you're looking at. When you open a conflicted file, Git will have inserted some special markers to pinpoint the problem areas. They might look a little intimidating at first, but they're pretty straightforward.
<<<<<<< HEAD: This is the start of the code from your current branch. Think of it as your local version.=======: This line separates your changes from the incoming ones.>>>>>>> [other-branch-name]: And this marks the end of the code from the branch you're trying to merge in.
Your job is to play the editor. You have to decide what the final code should look like, delete all of Git's markers (<<<<<<<, =======, >>>>>>>), and leave only the correct, combined code.
A Practical Approach to Conflict Resolution
Let's walk through a common scenario. You're merging main into your feature branch, and a conflict pops up in a JavaScript file. You open it up and see this mess:
<<<<<<< HEAD
const greeting = "Hello, user!";
=======
const greeting = "Hello, world!";
>>>>>>> main
Okay, so your branch (HEAD) has the greeting as "Hello, user!" but the main branch has "Hello, world!". To fix this, you just have to decide which one is right. Let's say the team standard is "world."
You'll edit the file to look like this, deleting the version you don't want along with all the conflict markers:
const greeting = "Hello, world!";Simple as that. Once the file looks correct, save it. Now, you just need to tell Git that you've handled the conflict by staging the file.
git add conflicted-file.jsAfter staging all the files you've fixed, you can finalize the merge with a commit. If you were in the middle of a git pull or git merge, you can just run git commit to seal the deal.
Using Tools to Your Advantage
While you can absolutely resolve conflicts in a plain text editor, modern IDEs like VS Code make the process much, much easier. They'll often show you a side-by-side comparison, highlighting the conflicting blocks and giving you one-click buttons to "Accept Current Change," "Accept Incoming Change," or even "Accept Both." This visual approach is way faster and less prone to human error.
Pro Tip: To get more context during a tricky conflict, tell Git to use the
diff3orzdiff3conflict style. This adds a third section showing the original code before anyone made changes, which can be a lifesaver for understanding what both developers were trying to accomplish.
You can set this for all future conflicts with one command:
git config --global merge.conflictstyle zdiff3Ultimately, the best way to deal with conflicts is to have fewer of them. If you frequently pull the latest changes from the main branch into your feature branch, you keep your work closely aligned with everyone else's. Small, frequent merges are always easier to untangle than one massive, complex one. It's a cornerstone of any smooth github pull and merge workflow.
Proven Best Practices for a Smooth Pull Request
Getting your code merged isn't just about writing good code; it's about mastering the human side of the process. A clean github pull and merge experience comes from good habits that show respect for your teammates' time and help build a culture of quality.
These are the unwritten rules that separate a frustrating, marathon pull request from one that sails through review.
Write Descriptions That Actually Help Your Reviewers
Think of your pull request description as the first and only chance to tell the story of your changes. When a reviewer sees a blank description, it's a huge red flag. It forces them to become detectives, piecing together the why from your code alone, which is a slow, painful process that invites misunderstanding.
Your description should be a quick guide to your work. What problem does this PR fix? Why did you pick this particular solution? If it's tied to a ticket, link it. If there are UI changes, throw in a screenshot or a GIF.
A well-crafted pull request description is an act of empathy. You're reducing the mental effort for your reviewers, which leads directly to faster, better feedback and a quicker merge.
This small bit of effort upfront pays off big time. It's the documentation for your change, making sure anyone - even you, six months from now - can understand what was going on. For a great template to follow, check out this detailed pull request checklist.
Keep Your Pull Requests Small and Focused
This is probably the single most important habit you can build. Nobody wants to review a pull request that touches a dozen files and changes thousands of lines. It's an intimidating wall of code that reviewers will either skim (and miss things) or put off until "later."
Aim for atomic pull requests that do one thing and do it well. For example:
- One PR to refactor a messy component.
- A second PR that uses the newly refactored component to add a feature.
- A third PR to fix a bug you found along the way.
This approach keeps each review focused and manageable. Your teammates can actually understand the scope of what you did, which means the quality of their feedback will be much higher. This mindset fits perfectly with broader Agile development best practices that prioritize small, iterative changes.
Automate Everything You Can
Code reviews are for humans to discuss logic, architecture, and strategy - not to argue about semicolons or indentation. Let the robots handle the boring stuff. This is where automation, specifically a Continuous Integration (CI) pipeline, becomes your best friend.
Your CI pipeline should automatically run before anyone even looks at your PR. It should handle:
- Linting and Formatting: Enforce a consistent style guide so all the code looks the same.
- Unit and Integration Tests: Prove that your changes didn't break anything.
- Security Scans: Catch common vulnerabilities before they ever get close to production.
When these checks are green, reviewers can trust that the basics are covered. They can immediately jump into the more important parts of your implementation.
This is also where AI assistants are changing the game. Research shows that tools like GitHub Copilot can boost the number of pull requests per developer by 8.69% and increase merge rates by 11%. By integrating smart automation and AI-driven checks, teams can seriously speed up their entire development cycle.
Common Questions About the Pull and Merge Process
Even with a solid workflow, a few questions seem to pop up constantly when my team is dealing with GitHub pulls and merges. Let's cut through the confusion and get you some straight answers so you can work with confidence.
What's the Real Difference Between Git Pull and Git Fetch?
This is a classic. I get asked this all the time.
Think of git fetch as the cautious, look-before-you-leap option. It dials up the remote repository and downloads all the new data, but it doesn't touch your local working files. It just lets you see what's changed. You can then inspect everything before deciding how to integrate it.
git pull, on the other hand, is two commands in one. It does a git fetch and then immediately follows it up with a git merge to slam those remote changes right into your current branch.
Personally, I use fetch 90% of the time. It gives me a moment to review incoming work. I only use pull for quick, low-risk updates on branches nobody else is touching.
Should I Use Merge, Squash, or Rebase?
Choosing a merge strategy really boils down to what your team values most in its Git history. There's no single "best" answer, just the one that makes the most sense for your project.
- Merge Commit (The Default): This option preserves the full, unabridged history of your feature branch, creating a nice little merge commit in your main branch. It's perfectly accurate but can make your project history look like a tangled subway map over time.
- Squash and Merge: This is my go-to for most features. It takes all the commits from your feature branch - "wip," "fix typo," "oops, another fix" - and bundles them into one clean, descriptive commit on the main branch. The result is a beautifully tidy, linear history.
- Rebase and Merge: This also gives you a clean, linear history by replaying your branch's commits on top of the main branch. It looks the cleanest of all, but it can get messy and even dangerous if multiple developers are working on the same branch.
The most important thing is consistency. Pick a strategy with your team and stick to it. A standard merge tells the full story, a squash cleans it up, and a rebase makes it perfectly linear.
How Can I Undo a Merge on GitHub?
We've all been there. You merge something, push it, and immediately realize it was a mistake. It's a stressful moment, but it's completely fixable.
The safest, most professional way to undo a merge that's already on a shared branch is with git revert.
First, you need the unique hash of the merge commit. You can find this in your Git log. Then, just run this command:
git revert -m 1 <merge-commit-hash>
This command is brilliant because it doesn't rewrite or delete history. Instead, it creates a new commit that is the exact opposite of the merge, safely backing out the changes. This is crucial for collaborative branches. Never, ever use git reset on a shared branch - it rewrites history and is a surefire way to create massive headaches for your teammates.
At kluster.ai, we think the best way to handle bad merges is to prevent them from ever happening. Our real-time, in-IDE code verification helps you enforce standards and eliminate regressions while you code, ensuring every pull request is rock-solid from the start. Learn how to cut your review time in half.