

Mastering vscode diff two files: A Quick Guide
Comparing two files is one of those things you do all the time in VS Code. The quickest way? Just right-click the first file in the Explorer, hit Select for Compare, then right-click the second file and choose Compare with Selected. Boom—you get an instant side-by-side diff view that highlights every single change.
Why Mastering File Comparison in VS Code Matters
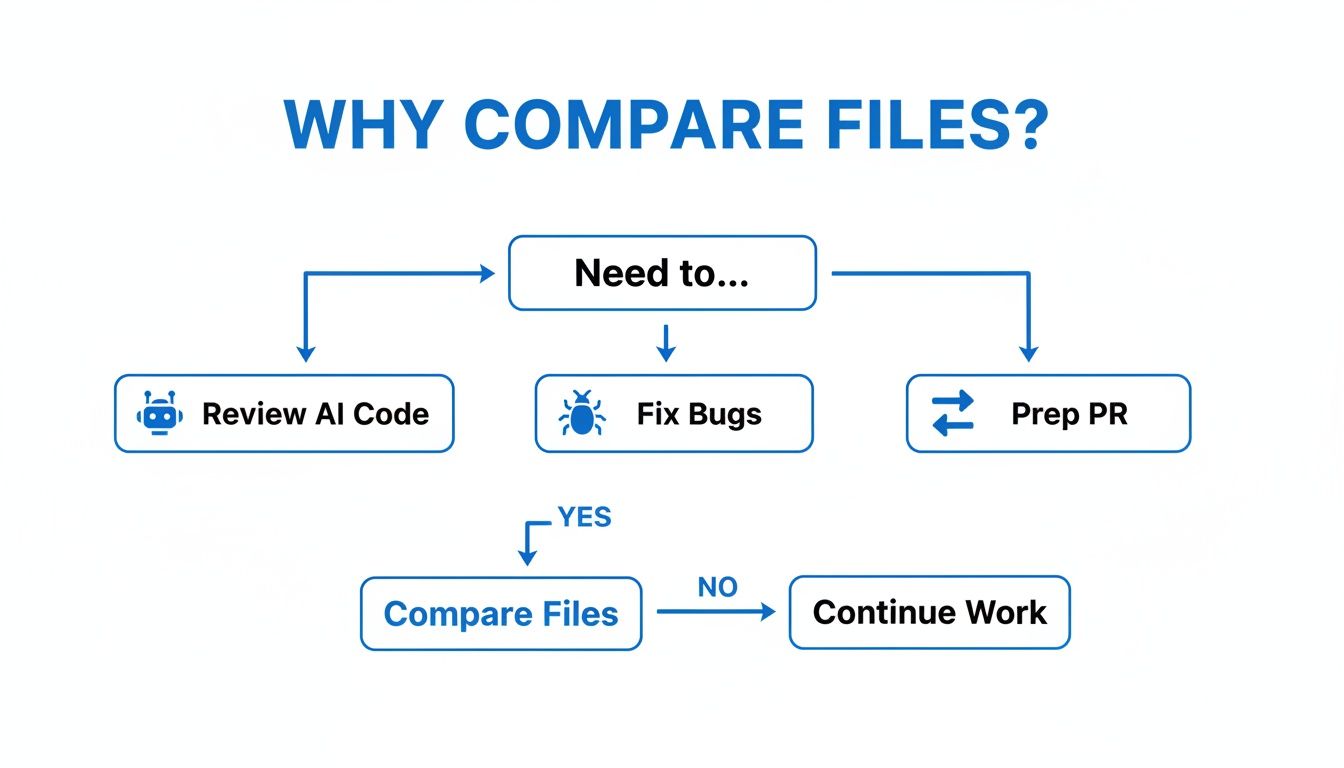
In modern development, speed and accuracy are everything. Being able to vscode diff two files isn't just a neat trick; it's a core skill that directly impacts how fast you work and the quality of your code. Once you move beyond the occasional check and really master the workflow, it changes how you handle your day-to-day coding challenges.
Efficient diffing becomes a total game-changer in a ton of real-world situations. Maybe you're reviewing a complex chunk of code an AI assistant spit out, or you're prepping a multi-file pull request for your team. Or maybe you're hunting down that one subtle bug that snuck in during the last commit. In every one of these cases, a fast and precise comparison is your best friend.
Boost Your Development Workflow
When you have a solid handle on VS Code's comparison tools, a routine task becomes a powerful part of your process. It's not just about seeing what's different; it's about understanding the why behind those changes. That insight is what helps you maintain high standards and work smoothly with your team.
Historically, code reviews have always eaten up a huge chunk of a developer's time, with manual diffing being a major time sink. Now, with AI coding assistants in the mix, the sheer volume of code needing review has exploded.
By mastering file comparison, you cut down on the mental energy it takes to do code reviews and debug. This frees you up to focus on the important stuff—like logic and architecture—instead of getting lost in manual line-by-line checks.
From Code Editor to Intelligent IDE
This skill is a perfect example of how VS Code bridges the gap between a simple text editor and a full-blown Integrated Development Environment (IDE). A basic editor lets you write code, sure, but a powerful IDE gives you tools that make you way more effective. Getting this distinction helps you pick the right tools for the job. If you want to dive deeper, you can check out our detailed comparison of IDE vs code editor to learn more.
Ultimately, mastering file comparison in VS Code helps you:
- Improve Code Quality: Catching regressions and accidental changes before they get committed becomes second nature.
- Accelerate Collaboration: Pull requests are easier to prepare and review, which means less back-and-forth with your teammates.
- Enhance Debugging: Quickly finding the exact line that introduced a bug can save you hours of frustration.
Quick And Easy Ways To Compare Files
When you need to see what’s different between two files, VS Code has some great built-in tools that don't require you to ever touch the command line. These point-and-click workflows are my go-to for quick visual comparisons during a normal coding session. They're fast, intuitive, and get the job done.
Developers compare files all the time—it's a core part of the job. You might be reviewing a teammate's changes, hunting down a regression bug after a recent commit, or just making sure your refactor didn't break anything.
As you can see, whether you're working with AI-generated code or prepping a pull request, being able to quickly diff files is essential. Let’s dive into the easiest ways to do it.
Comparing From The File Explorer
The most straightforward method starts right in the Explorer side panel. This is perfect when you know exactly which two files you want to inspect, even if you don't have them open.
Let's say you just refactored a component, NewComponent.js, and want to check it against the original, OldComponent.js.
- First, find
OldComponent.jsin the Explorer. Right-click it and choose Select for Compare. This tells VS Code that this is your baseline file. - Next, find
NewComponent.jsin the list. Right-click it and select Compare with Selected.
That's it. VS Code immediately opens a new tab with a side-by-side diff view. It’s a familiar sight for anyone who’s used Git: red highlighting on the left for deleted lines, and green on the right for added lines. This gives you an instant, crystal-clear overview of every single change.
This visual, line-by-line comparison is one of the most fundamental tools for debugging and code review, a fact well-documented by developers. You can find more insights on just how critical effective file comparison is on semanticdiff.com.
Diffing Two Open Tabs
What if you already have both files open? This happens to me all the time when I'm deep in a task and just need a quick sanity check. The good news is the process is just as simple, and you don't even have to leave your editor view.
- With both files open as tabs, right-click the tab of the first file and hit Select for Compare.
- Then, just right-click the tab of the second file and choose Compare with Selected.
This workflow is incredibly efficient for comparing your active work against a reference file—like an old implementation or a colleague's version—without losing your place. It keeps your focus sharp and your flow uninterrupted.
Command Palette: The Power User’s Route
If you live in the Command Palette (like I do), you can kick off a comparison without ever touching your mouse. This is my preferred method when I'm in the zone.
Bring up the Command Palette with Ctrl+Shift+P (or Cmd+Shift+P on Mac) and start typing "compare." You'll see two key commands:
- File: Compare Active File With... This is the one you'll use most often. It takes the file you're currently editing and opens a file picker so you can choose the second file to compare against. It’s incredibly fast.
- File: Compare Selected Files in Explorer. This one is a bit different. It requires you to first select two files in the Explorer panel (by holding Ctrl/Cmd and clicking them), then running this command. It achieves the same result as the right-click method but through the keyboard.
Personally, I find Compare Active File With... to be the most fluid for my day-to-day work.
Before we move on, let's quickly recap these core, built-in methods.
Core VS Code Comparison Methods at a Glance
Here’s a quick summary to help you decide which method to use at a glance.
| Method | Best For | Key Action |
|---|---|---|
| File Explorer | Comparing any two files in your project, open or not. | Right-click a file > Select for Compare > Right-click second file > Compare with Selected |
| Open Tabs | Quickly diffing two files you already have open. | Right-click a tab > Select for Compare > Right-click second tab > Compare with Selected |
| Command Palette | Keyboard-driven workflows for speed and efficiency. | Ctrl+Shift+P > File: Compare Active File With... |
Each of these built-in methods serves a slightly different workflow, but they all get you to the same powerful diff view without any fuss.
While pointing and clicking gets the job done, real efficiency comes from keeping your hands on the keyboard. For anyone serious about moving faster in VS Code, there are some powerful, keyboard-centric ways to diff files that will absolutely speed up your workflow. These techniques are all about speed and integration, letting you compare files without ever breaking your coding rhythm.
The heart of this faster workflow is the Command Palette. Hit Ctrl+Shift+P (or Cmd+Shift+P on macOS), and you've unlocked a command-driven interface that lets you bypass menus and mouse clicks entirely. This is where you can kick off a comparison with just a few keystrokes—a habit that quickly becomes second nature for power users.
Master the Command Palette for Diffs
Once the Command Palette is open, just start typing "compare." VS Code filters the commands in real-time, instantly showing you the most relevant options for diffing.
You'll see a few primary options here:
- File: Compare Active File With... This is my go-to. It takes the file you're currently editing and pops open a file picker. From there, you can quickly select any other file in your project to see how they differ.
- File: Compare Active File with Saved. A total lifesaver. You ever make a flurry of changes and lose track of what's new? This command instantly shows you exactly what’s different from the version on disk. It’s perfect for a quick sanity check before you commit.
- File: Compare Active File with Clipboard. This one is a hidden gem. You can copy a block of code from anywhere—a website, a Slack message, another editor—and immediately compare it against your active file. No need to create a temporary file first.
The Command Palette transforms file comparison from a deliberate, multi-step action into an almost instantaneous reflex. This is crucial for staying focused during complex debugging or refactoring sessions where you're constantly checking changes. It minimizes context switching and keeps you locked in.
Integrate Diffs with the Command Line
For those of us who live in the terminal, VS Code’s command-line interface (CLI) gives you a powerful way to launch a diff directly. If you have the code command installed in your PATH, you can start a comparison right from your shell, without even having the editor open.
This is incredibly useful if you want to integrate VS Code's excellent diff viewer into external scripts or build processes. The command itself is simple but powerful:
code --diff <file1> <file2>
Running this command fires up a new VS Code window (or a new tab, depending on your settings) with a side-by-side diff of file1 and file2. Imagine you're navigating a project in your terminal, spot two configuration files you need to check, and can immediately launch a visual diff. It’s the perfect bridge between the terminal and the GUI, giving you the best of both worlds.
Using Git for Powerful Version Comparison
When your project lives in a Git repository—and let's be honest, most do these days—VS Code becomes an incredibly sharp tool for version comparison. You're no longer just comparing two random files. Now, you can instantly diff your current work against its history. This is where the editor really flexes its muscles for any serious development workflow, moving past simple A-to-B checks into meaningful, context-aware analysis.
This tight integration is a massive win for productivity. Since something like 85-90% of modern development teams rely on Git, having this built right in means you can see your changes without ever leaving the editor.
Navigating Changes in the Source Control Panel
Your command center for all things Git in VS Code is the Source Control panel. The quickest way to pull it up is with the shortcut Ctrl+Shift+G. This view neatly lists every file you've touched in your working directory, right under a "Changes" section.
Just click on any file in that list. Bam. You're immediately in a diff view. VS Code automatically compares your current, unsaved changes against the version from your last commit (HEAD). It's the fastest way to get a clear, side-by-side breakdown of what you've done since you last saved your progress.
Decoding the Gutter Indicators
As you're editing a file that's part of a Git repository, VS Code gives you live feedback right in the gutter—that little space next to the line numbers. These subtle markers are your at-a-glance guide to what's changed.
- A green vertical bar shows up for any line you've added.
- A red triangle points to where you've deleted one or more lines.
- A blue vertical bar means you've modified an existing line.
These little indicators are unbelievably useful. You can quickly scan a file and get the gist of your edits without even needing to open a full diff view. Better yet, clicking on a marker pops up a small window showing you exactly what the content looked like before you changed it.
This instant visual feedback is a core part of what makes coding in a Git-aware editor so efficient. It removes the guesswork and provides continuous, passive information about your work's state relative to the project's history.
When working on a team, understanding how your changes fit into the bigger picture is crucial. After you've reviewed your local diffs, the next step is often pulling in work from others. For more on that, check out our guide on how to pull and merge in GitHub.
Comparing Across Different Branches
Here's where things get really powerful: comparing a file across different branches. Let's say you're chipping away on a new feature branch and need to see how a specific file has diverged from the main branch.
You can do this right from the integrated terminal in VS Code (Ctrl+`` ). Just run this Git command:
git diff main...your-feature-branch -- path/to/your/file.js
This command spits out the differences directly in the terminal, giving you a precise comparison for a single file between the two branches. While Git nails version comparison for code, the underlying principle of managing different versions is vital in business, too. For instance, you can see the critical role of version management in data protection.
Supercharge Your Diffs with Essential Extensions
While VS Code's built-in diff tools are fantastic for most day-to-day tasks, the real magic happens when you dive into the Marketplace. Extensions can take your comparison workflow from just "good enough" to absolutely indispensable, especially when you're facing complex scenarios that go way beyond a simple two-file check.
These add-ons are built to solve the specific, sometimes frustrating, situations developers run into all the time, saving you a ton of mental overhead.
Compare Entire Directories
One of the most powerful extensions you can grab is Compare Folders. Picture this: you just updated a major dependency, and now dozens of files are scattered across your node_modules directory. Trying to track those changes one by one is a complete nightmare. That's exactly where Compare Folders comes in, giving you a clean tree view of two directories and highlighting every single new, modified, or deleted file.
It's an absolute lifesaver for scenarios like:
- Checking the real impact of a package update.
- Reviewing all the changes across an entire feature branch.
- Getting two different project environments back in sync.
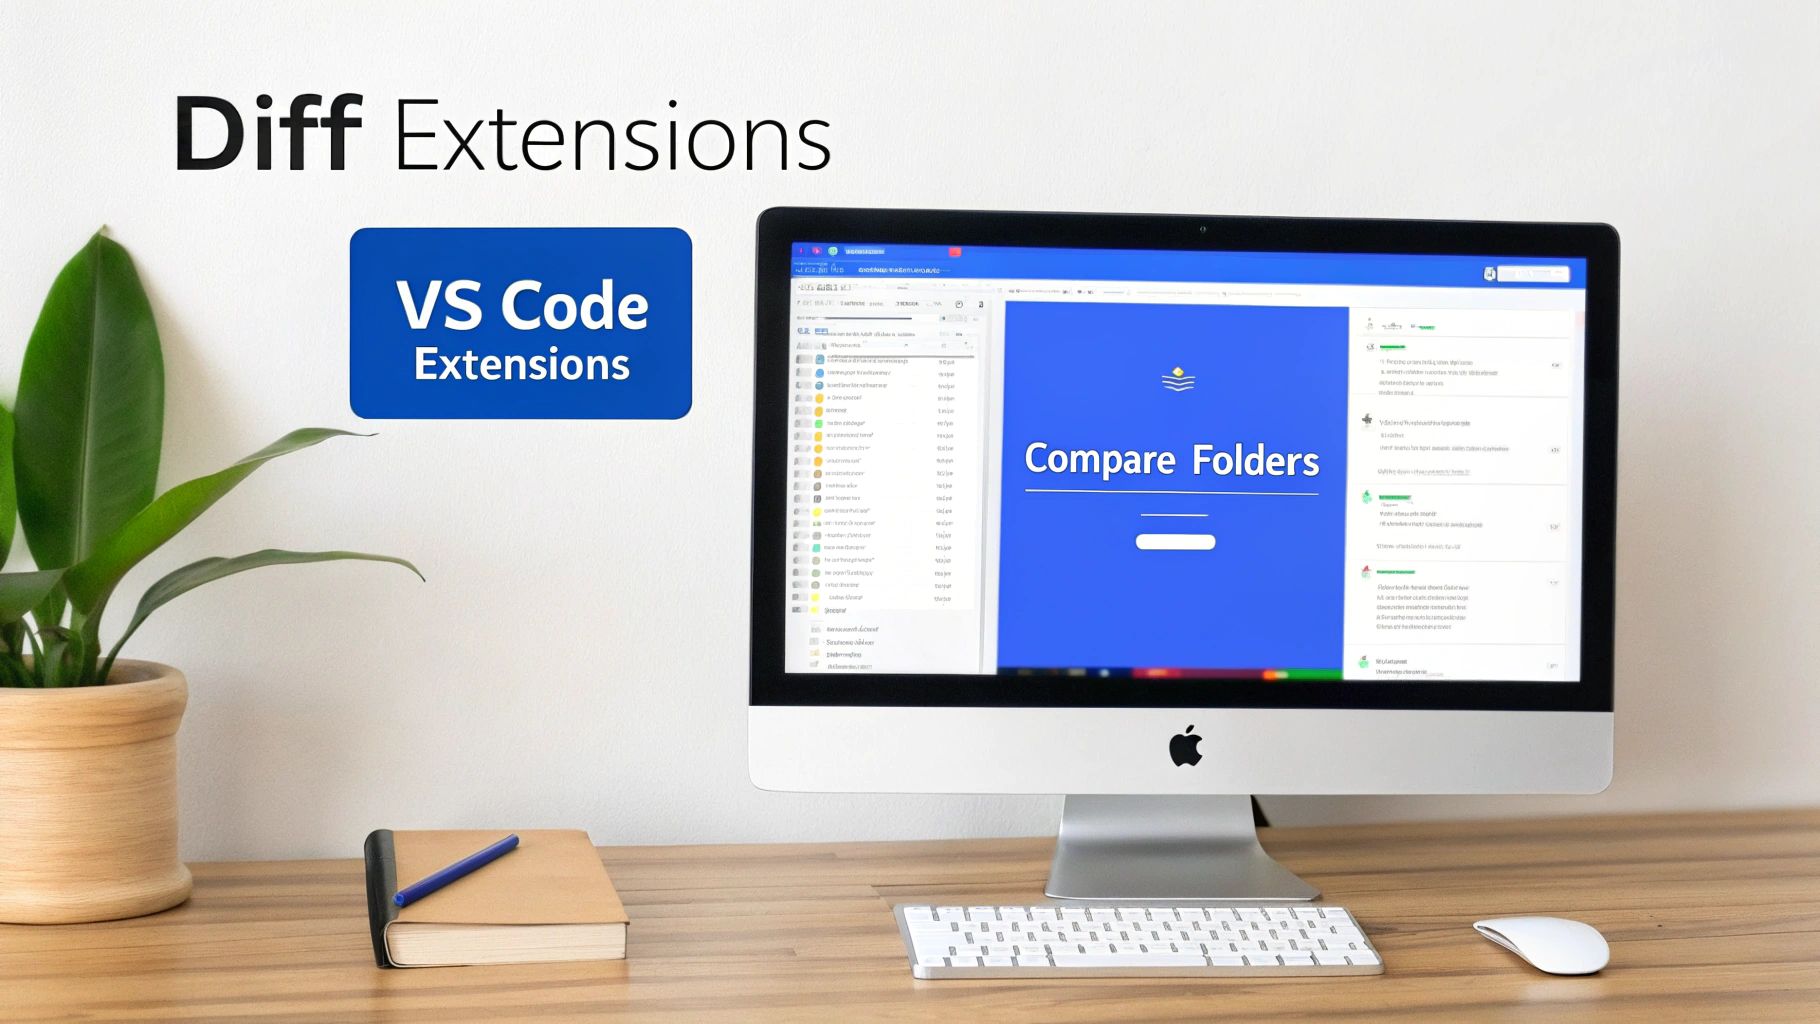
This screenshot shows just how clean the output is. You get an organized, at-a-glance view of what's different across a project's structure. From there, you can just click on any file to pop open the standard diff view for a closer look.
Focus on What Matters with Semantic Diffs
Standard diff tools work line by line, which means a simple formatting tweak can light up your screen with changes that don't actually matter. Semantic diffing extensions are way smarter. They understand the structure of your code, which lets them ignore trivial stuff like extra whitespace or reordered import statements.
This intelligent approach is a game-changer during code reviews. In fact, studies show that semantic-aware diffs can cut down the noise in comparison reports by 40-50%, letting you focus on the logic. For this level of power, integrating an external tool is a great move. The Beyond Compare extension, for example, lets you launch its powerful diffing engine right from VS Code. You can find more details about the Beyond Compare integration and its capabilities on the marketplace.
By filtering out all the cosmetic adjustments, semantic diffs help you spot meaningful bugs and logic errors far more effectively. Your code reviews get faster and stay focused on what actually impacts how the code works.
Beyond the usual suspects, exploring specialized diffing projects like Diffray can unlock even more powerful comparison features. These tools often push the boundaries of what’s possible with code comparison. Picking the right extension can transform VS Code into a highly specialized tool for pretty much any comparison task you can throw at it.
Common Questions About Diffing Files in VS Code
Once you start using VS Code's diff tool regularly, you'll inevitably run into some specific situations and edge cases. Figuring these out is what turns a useful feature into an indispensable part of your workflow. Let's walk through some of the most common questions that pop up.
Getting these little details sorted out means you can stay focused on the code, not the tooling.
How Can I Compare a File with a Previous Version from Git?
VS Code’s Git integration is fantastic and makes this incredibly easy. First, just open the file you want to check. Now, look in the Explorer side panel for a section at the bottom labeled Timeline.
Clicking on the Timeline reveals the file's entire commit history. From there, just pick any previous commit, and VS Code will instantly pop open a diff view comparing that historical version against your current working copy. I use this all the time to track down when a bug might have been introduced or to understand how a piece of code has changed over time.
Is It Possible to Ignore Whitespace Changes in the Diff View?
Yes, and this is an absolute lifesaver, especially when you're on a team where everyone's editor is configured slightly differently. Ignoring whitespace helps you focus on what actually changed in the logic, not just formatting tweaks.
Inside the diff editor, look for the ... (More Actions) icon in the top-right corner. Click it, and you'll see an option to Ignore Trim Whitespace.
For a more permanent fix, you can add
"diffEditor.ignoreTrimWhitespace": trueto yoursettings.jsonfile. This makes it the default behavior, which is a great way to keep your diffs clean and focused on what really matters.
Can I Diff the Active File Against My Clipboard Content?
Absolutely. This is a powerful and seriously underused feature that saves a ton of time. Just copy the code you want to compare from anywhere—a website, a Slack message, or even another project.
With the code copied, open the Command Palette (Ctrl+Shift+P or Cmd+Shift+P). Start typing "Compare" and select the Compare Active File with Clipboard command. VS Code immediately opens a diff view, letting you see the differences without having to create temporary files. It's a game-changer for quick checks.
What Is the Best Way to Resolve Merge Conflicts?
VS Code has an excellent three-way merge editor that makes untangling conflicts much less painful. When you open a file that has a merge conflict, the editor clearly highlights the conflicting blocks.
Above each conflict, you get a few clickable actions:
- Accept Current Change
- Accept Incoming Change
- Accept Both Changes
You can either click these handy links or just edit the code directly in the bottom "Result" pane to craft the perfect merge. Once you’re happy with how it looks, save the file and then stage it in the Source Control panel to finish the merge. It’s a much more visual and intuitive way to handle what can otherwise be a messy process.
At kluster.ai, we're obsessed with making development workflows more efficient. Our real-time AI code review platform runs directly in your IDE, catching errors and enforcing your team's standards before they ever become a problem. Eliminate PR ping-pong and merge trusted code faster. Visit https://kluster.ai to start for free.